When signing up for one of AnsweringService.com’s live call answering services, you’ll choose a Receptionist Number (either a local number or a toll-free number). This unique number allocated to your account is also known as your Receptionist Number.
To ensure your business calls can be answered by our team of receptionists, you need to either:
- Start to advertise your Receptionist Number on your website and elsewhere as your business number
- Enable call forwarding from your existing advertised business number to your Receptionist Number
Many businesses opt to forward calls from their existing number and this article is intended to help you do so.
How is call forwarding managed?
Setting up call forwarding from your existing business number is your responsibility. AnsweringService.com cannot handle this for you.
How you need to set up your call diversion is dependent on two things:
- Your telecommunications provider
- Whether or not you want all your calls answered by us
Many telecommunications providers will allow you to forward calls in different ways:
- Immediate call forwarding
- Delayed call forwarding (for example, only if calls are not answered within a set duration or there’s a busy signal)
Each can be useful for particular circumstances, as outlined below.
Immediate call forwarding.
Having calls forwarded immediately is typically the best solution for most businesses. If someone calls your business number, the call immediately goes through to our receptionist team.
After-hours answering
If you want to answer calls in-house during standard business hours, but have after-hours calls answered by AnsweringService.com, you can simply:
- Turn call forwarding on at the beginning of the business day
- Turn call forwarding off when the business day ends
Delayed call forwarding.
This provides a simple call overflow solution. When a call is made to your business number, your in-house team members always have the opportunity to answer. But if they’re too busy and can’t get to the phone, or already on another call, the call will be diverted to AnsweringService.com.
“No answer” diversion
Call forwarding occurs only if a call is not answered within a specific duration (generally between 5 seconds and 30 seconds, depending on your telecommunications provider and your diversion settings).
“Busy signal” diversion
Call forwarding occurs only if your line is busy.
Call forwarding set-up instructions.
Below you’ll find call forwarding instructions for some popular telecommunications providers, however we always recommend that you check the settings with your particular provider in case they’ve changed their processes.
Click on your telecommunications provider’s name to see relevant call forwarding set-up instructions.
Tap on your telecommunications provider’s name to see relevant call forwarding set-up instructions.

Forwarding from AT&T
To forward all calls immediately: Dial *21* followed by the 10-digit Receptionist Number that you want to forward your calls to, then press #.
To disable immediate call forwarding: Dial #21#
Delayed call forwarding
Please call 800.288.2020 for AT&T agent assistance to arrange either of the following:
- Call forwarding when your number is busy
- Call forwarding when you do not pick up after a certain number of rings

Forwarding from Call Rail
- Sign into your Call Rail account.
- Click Tracking at the top of the page.
- Choose the phone number that you would like to forward to us, and click Edit.
- Click Edit next to Number Options.
- Scroll down the page until you reach the Forward calls section. Within that section, you will enter the 10-digit Receptionist Number.
- Click Save.
- Once completed, click Return to Tracking.
- Ensure that when you are viewing the numbers on your account, the 10-digit Receptionist Number is located next to the business number(s) you are forwarding.
Note: If you are trying to forward multiple numbers to us, you must repeat steps 3 to 6 for each individual number.

Forwarding from Dialpad
Note: You MUST be on the phone to complete.
- From dialpad.com, navigate to your Settings and scroll to Your Devices.
- Select Add New and then Add New Forwarding Number located at the bottom of the list.
- Input your 10-digit Receptionist Number and verify.
- Once the submitted number is called and the prompt of “press 1” is executed, your forwarding is successful.
- To turn OFF forwarding, remove the number.

Forwarding from Google Fi
- From the Google Fi app main screen, scroll to Call Forwarding.
- Tap Call Forwarding in your Phone Settings.
- Tap Add a number.
- Tap the Number field.
- Enter your 10-digit Receptionist Number.
- Tap the Next key.
- Enter a description (for example, AnsweringService.com Receptionists).
- IMPORTANT: Stop there and contact our customer service team before proceeding.
- AFTER contacting our customer service team, tap Verify by Call.
- The number you entered will receive a verification code from Google Fi, which will then be provided to you by our customer service team.
- Tap the 6-digit code field.
- Enter your code and click Verify.

Forwarding from Google Voice
You MUST have a pre-announcement. You MUST NOT have a VPN turned on.
- Click on the setting icon (the gear at the top right of the screen).
- Turn all PRE-SET settings off by clicking the Green Switch Buttons to gray them out.
- Under the Account tab on the settings page (scroll to the top of the page), click the + New Linked Number.
- Enter your 10-digit Receptionist Number.
- IMPORTANT: Stop there and contact our customer service team before proceeding. You are only allowed 3 attempts to connect the forwarding successfully. If all 3 attempts are unsuccessful, you will need to wait 24 hours before trying to forward again.
- AFTER contacting our customer service team, click Verify by Phone (not SMS).
- Click the Call button, then click Call again.
- A pop-up window will appear in the field to enter the G-code, which will be provided to you by our customer service team.
- Once the G-code has been entered, click Verify.

Forwarding from Grasshopper
- Go to Settings > Call Forwarding Settings > Extensions
- Click Edit next to the number and extension, or create a new one.
- Select how you want Grasshopper to handle incoming and unanswered calls for each number you enter.
- Enter your 10-digit Receptionist Number.
- You can configure your own schedule based on time of day and which phone you’ll be using.
- Choose which order you want Grasshopper to call each number.
To turn off call forwarding: Click Delete beside the Receptionist Number.

Forwarding from JustCall
Conditional forwarding
- Navigate to the Number section & select an IVR-enabled JustCall Number.
- For an IVR option, select External Number in the drop-down under the Unanswered Call Forwarding Setting. Enter the number where you’d like to receive the call.
- Click Save Changes.
Landline
To enable call forwarding: Dial *72, enter the 10-digit Receptionist Number to receive your redirected phone calls and press # then listen for a confirmation tone before hanging up.
To disable call forwarding: Dial *73 and wait to hear the confirmation tone.
Smartphone mobile app
- In the top left corner, click on your account image.
- Click Manage.
- Choose the phone number for which you wish to enable call forwarding.
- Click Call Forwarding, then input your 10-digit Receptionist Number.
- Click Save.

Forwarding from Nextiva
As an admin
From the NextOS admin home page, select Users > Actions > Voice Settings > Forwarding > Call forward always. Then, enter the 10-digit Receptionist Number.
As a user
To enable call forwarding: Dial *72 followed by the 10-digit Receptionist Number to forward calls to and then press #.
To disable call forwarding: Dial *73

Forwarding from Ooma
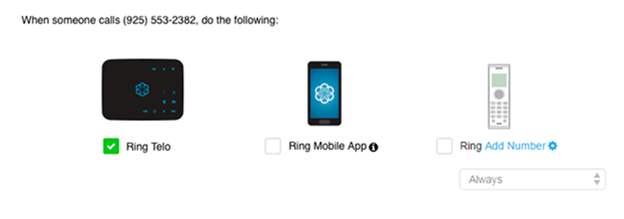
You can enable call forwarding by logging into your My Ooma account and navigating to the Call Forwarding option under the Preferences tab. You should see a page that is similar to the one pictured below.

Check the box to the left of each device that you would like to have ring when an incoming call comes in. You can choose any or all of the following devices:
- Ring Telo: Your Ooma phones connected to your Telo Base Station or Phone Genie will ring.
- Ring Mobile App: Calls can be received through the Ooma Home Phone app on your iOS device or Android device if you are running the latest version.
- Ring [Number]: Calls can be forwarded to any domestic landline or cell phone. You can set up or update the forwarding number by clicking on the cog icon. You can also specify the circumstances under which calls will be forwarded to your Receptionist Number.

Forwarding from RingCentral
- Sign into your RingCentral online account.
- Follow the navigation path depending on your access profile.
- Admins: On the Quick Access page in the Admin Portal, navigate to Users > Manage Users. Select the extension to configure, then click Call Forwarding and Voicemail.
- Users: Navigate to Settings > Call Forwarding and Voicemail.
- Under the Work Hours tab, click Add number or coworker (see screenshot below).
- Choose whether the added number is a Number or Coworker under the Name column.


Forwarding from Sprint
To enable call forwarding: Dial *72 plus the 10-digit Receptionist Number that you want to forward your calls to.
To disable call forwarding: Dial *720 and wait to hear the success message.

Forwarding from T-Mobile
To enable call forwarding: Dial *72 plus the 10-digit Receptionist Number that you want to forward your calls to, followed by #.
To disable call forwarding: Dial *73 and wait to hear the confirmation dial tone.

Forwarding from Verizon
To enable immediate call forwarding: Dial *72 plus the 10-digit Receptionist Number that you want to forward your calls to.
To enable delayed call forwarding (“no answer” or “busy signal”): Dial *71 plus the 10-digit Receptionist Number that you want to forward your calls to.
To disable call forwarding: Dial *73.

Forwarding from Vonage
- Dial *72 from your Vonage phone and listen for the prompt.
- Enter the area code and 10-digit Receptionist Number to which calls will be forwarded.
- Press 1 to confirm or 2 to enter a different phone number.

Forwarding from Wix
- Go to Business Phone Number in your site’s dashboard to access your settings.
- Click +Add Forwarding Number in the Call Forwarding section.
- Click and select a call agent drop-down and add the desired call agent. Note: You can click Add Call Agent to add more agents to your team.

Forwarding from ZOOM Phone
- Sign into the ZOOM web portal.
- Click Phone.
- Click the Settings tab.
- In the Business Hours or Closed Hours sections, click Edit next to Call Handling (see note on holiday hours below).
- Click Add Phone Number to forward to your Receptionist Number.
- Make sure to select the correct Country/Region in the dropdown menu so you can add the external phone number. Some countries share the same country code but have separate entries in the dropdown menu.
- At Phone Number, enter your 10-digit Receptionist Number.
- In the optional Description field, you can enter a description to help you identify your Receptionist Number (for example, AnsweringService.com Receptionists).
- Click Save.
Holiday hours
To edit call handling settings for Holiday Hours, at step 4 simply click Manage next to Holiday List & Call Handling, select a holiday, then click Edit next to Call Handling.
Back to all news


